1Click飲みRomoCartTempescope色色[:iroiro]Other Projects

2015年9月27日日曜日

Auto-generated popup cards from 3D point cloud data

As a parent, one of the things I like about owning a depth camera (like a Kinect or an Asus Xtion) is that you can take 3D photos of your child.
This is great for immersing in old memories using things like the Oculus Rift,
but has the problem that you can't easily print them out and prop them up on your office desk, as you would do for normal photos.

Sure you could try 3D printing them, but they're still expensive (or really low resolution), and they still don't have the casual feel of printing out photos on paper. (They take up storage space, you can't keep one in your wallet, and they certainly can't be sent in an envelope.)

I noticed the possibility of using popup cards as an easy fix for this problem.
These are lightweight, can handle photo-level quality, and is 3D!
Popup cards, like the things you have in holiday cards.
In this mini-project, I created a program that automatically generates popup cards from 3D point cloud data (collected from an Xtion).

How it works

1. Take a 3D photo of your kid
 or your cat or whatever.


2. Cluster the 3D points into several "layers"
At the point cloud consists of individual coloured points floating in 3D space, which you can't just print onto paper.
Therefore you need to somehow reorganize the points into planes. 

While there are many ways of doing this, I took the quick and dirty approach of simply clustering the points by the distance from the camera.
The image below shows the points as seen from the side, and a histogram of the number of points at each distance from the camera.
You can see that there are peaks in the histogram where there are objects (people, walls, etc). Simply k-means clustering this lets you (sort of) split the points into a small number of layers composed of points that come from spatially close objects.

(Top) The original point cloud seen from the side (Bottom) Histogram of points for distance from camera
This is an example of clustering into 2 layers. You can see that the point cloud was separated into objects in the foreground (1st layer) and the entire back wall (2nd layer).
Point cloud separated into 2 layers
3. Merge the layers into a single card
Now that the point cloud is composed of planes, we can just merge them onto a single card, offsetting one layer from another slightly so that there's a 3D effect when they're cut out.
The below image was generated automatically from the layers, with the red lines added by the program to show where you should cut in order to make this card "popup"-able.
(There are actually some extra steps before this like cleaning the layers to ensure the card stands on its own, but I'm omitting this because it's boring.)
Cut the red dotted lines, and you get a 3D popup card.
And here we have (a rendering of) a popup card:

4. Print it
You can just print the card generated as above, cut the red dotted lines, and you get this:
Popup baby!
They're cheap and quick to mass produce.
The photo quality of the cards is somewhat low (because of the quality of the Xtion camera), but I hope you see that having a 3D popup card literally adds a new layer of expressibility compared to ordinary photos.

Summary

In this project, I proposed and implemented a simple algorithm to auto-generate popup cards from 3D point cloud data generated from off-the-shelf cameras.
This provides a much cheaper alternative to 3D printing models, while also adding an extra dimension of expressibility compared to 2D photos.

- Requiring everyone to take 3D photos using a Kinect/Xtion might be slightly unrealistic, but there are certainly more approachable alternatives (like 3D digital cameras e.g FinePix 3D).  We could also go towards a different direction, where we recognize objects from normal 2D photos and 3D-ify them.

- My main usecase for this is that I want to put (3D) photos of my kid on my work desk. There are actually many more benefits of this proposed method, like being able to fold them up and keep them in your wallet, or you could put them in an envelope and send them as holiday cards.

- I haven't released the source code or made this available as a webservice because I haven't had the time, but contact me if you're interested in making your own popup card.

- As a final side note, taking 3D photos of your family on occasions is highly recommended. They're great ways to look back on old memories.

子供の3D写真からポップアップカードを自動生成しよう

親バカ以外あまり共感できないであろう話をします。

僕はたまに子供の写真をKinectで撮影します。
そうするとこんな風に3Dで記録できるのでOculus Riftで没入したりできるのですが、
このままでは普通の写真みたいに机に飾れないという問題があります。

もちろん3Dプリンタを使えば立体的に印刷することも可能ですが、
今の印刷粒度ではこんな化物みたいになってしまい、子供を愛でるどころの騒ぎではなくなってしまいます。
また3Dプリンタで印刷すると高いし、印刷物は壊れやすい(ので郵送に気使う)し、持ち運びしにくいという問題もあります。
化物みたいになったAくん
「立体的に」「写真並の分解能を保って」「安く」立体画像を飾る方法はないのでしょうか?
こういうの。
これなら立体的ですし、紙の印刷物なので写真クオリティも出せるし、なにより安いですね。
更に畳めば財布に入れておいたり、封筒で実家に送ったりすることもできます。
そこで今回はKinectで撮影した3D点群データから、自動的にポップアップカードを生成するプログラムを作ってみました。

やり方

1. 子供をKinectで撮影する。
 こんな感じの点群が取れます。子供じゃなくて猫とかでもいいです。


2. 点群をクラスタリングして数枚のレイヤーに分ける
元の点群データのままでは面ではないので紙に印刷することはできません。
近い点同士を集めて面状に整形する必要があります。

ここはいろんな方法が考えられますが、今回は超簡易的にカメラからの距離によって(k-meansで)クラスタリングすることで面に分ける、ということを行います。
点群データをカメラからの距離毎に点のヒストグラムにすると、以下図のように人・物・壁の位置にピークが立ちます。

元の点群データを横から見た図(上)と、各距離にある点の数(下)
これを簡単のためとりあえず2クラスタに分けてみるとこんな感じで、距離的に近い点同士が大体同じレイヤにまとまるようにクラスタリングされます。
近い面と遠い面に分かれました
3. 1枚のカードに結合する
で、各レイヤーを一枚の面上に結合し、切り抜き方を計算します。
以下図のように、レイヤーを少しずつ段差をずらして一枚の紙上に結合し、切り抜き線を計算して赤線を引きます。
(この際、最終的なカードがちゃんと自立するようにレイヤーを綺麗にする処理がありますが、面倒なので説明を割愛します。)
赤い点線を切り抜くとレイヤーが切り出される。
こんな感じで、1枚のカードを切り抜くと各レイヤーが立体的に現れる構造が作られます。
 これはシミュレーションのCGですが・・・

4. 実際に印刷してみる
実際に印刷してみました。

完成。かわいい。
大量生産できます。
ちょっと(元がKinectなので)画質が雑ですが、立体ならではの躍動感があります。

まとめ

今回はKinectから取得した点群データに基づき、ポップアップカードを自動生成するアルゴリズムを作り、実験してみました。
3Dプリンタよりも写真に近い画質で立体感を維持したまま、卓上に飾ることのできるディスプレイを作ることができました。
これなら子供の写真をバシバシ写真撮ってガンガン印刷して飾れます。

・Kinectで撮影するのは少し一般向けにはハードルが高いですが、最近は市販の3Dデジカメもあります。また、平面画像からでもオブジェクト認識してレイヤー分けしたりできるかもしれません。

・僕は自分の子供の写真を会社の机に飾りたいという気持ちだけで作りましたが、例えば家族写真を封筒に入れて送ったり、財布に入れておいたりできるという便利さもあります。

・面倒なのでサービスにしてないですが、ポップアップカード作って欲しいという人がいたらご連絡ください。

子供の写真を3Dで残してないのはもったいないぞ!

2015年7月15日水曜日

ひまわり8号の衛星写真で遊んだ

2015年7月7日にひまわり8号が運用開始しました。
このようにめっちゃ綺麗な画像が撮れるので、クローリングして色々動画にしてみました。


データ取得

ここから取りました。550pxのタイルで全球(1倍)から詳細(16倍)まで5段階の画像が10分毎に用意されています。
Firebug等で取得されてる画像を見れば、すぐに元画像の場所が分かります。

いろんな動画作った

で、ゴニョゴニョして、いろんな動画を作ってみました。

7月12日の素敵な瞬間集

手作業で素敵なシーンを選択して動画にしてみました。
日の出が鳥肌たちますね。

台風が見れる!

近づく台風:

こっちは台風12号の発生から日本上陸まで。
ただの熱帯低圧から台風に育ったあと熱帯低気圧に格下げされ、また台風に帰り咲いた根性野郎です。

こちらは2015年7月の全ての台風の経路をアニメーション


火山の噴火が見れる!

なんか煙が上がってる・・・

なんとパプアニューギニアのマナム火山が噴火したらしいです。

これぐらい引いても噴煙が見えるのが凄いですね。

山火事?が見れる!

オーストラリア西部で黒い煙が上がってました。
山火事っぽくもありつつ、これ多分砂漠なのでなにが燃えてるのか不明。
あとこういう煙が何箇所かから上がってたので、もしかして人為的かも知れません。

オーストラリアの潮の満ち引きが見れる!

毎日の12時を見ると、海の色が大きく変わっている様子が見えます。
特に注目は、右中央の赤い砂が見え隠れるするところ。一度行ってみたいですね。


月が見れる!

ずっと探してたのですが、ようやく月を発見しました。台風17号とのツーショットです。

せっかくなので機械的に認識して過去の月の出現も見つけてみました。


日食が見れる!

3月9日の日食がばっちりひまわり8号の可視範囲だったので綺麗に撮れました。


タイプラプスを見続けたい

上の動画みたいに綺麗なシーンを手作業で選び出してもいいんですが、面倒ですよね。
そこでいい感じのタイムラプスを自動で生成するプログラムを作りました。
この動画は2時間分の自動生成したタイムラプスです。

部屋に地球を浮かばせたい

地球が好きすぎて、こんなの作りました。
部屋に中心にプカンと浮く地球です。
(実際は衛星画像を投影したただの発泡スチロール)


投影法変換

取得した画像のどのピクセルが地球上のどの座標に対応するのか計算できると色々便利です。
ひまわり8号の画像はNormalized Geostationary Projectionの投影画像。これをゴニョゴニョやると、こんなふうに緯度経度の線を引いたり、

OpenStreetMapから座標と名前を引いてきた都市名を表示したりできるようになりました。

改めて座標とともに見ると、いろんなことがわかります。

画像の一番右端にはハワイも映ってたんですね。

左端はインドまで見えてます

他に「こんな動画が見たい!」というものがあったら是非ご連絡ください。作ります。

2015年6月8日月曜日

A T-shirt that makes sweaty armpits socially acceptable (sort of)

Summer is the season of the sweaty armpit.
While a quick search reveals that most people try to deal with sweat by somehow stopping it,
I tried taking a different approach:
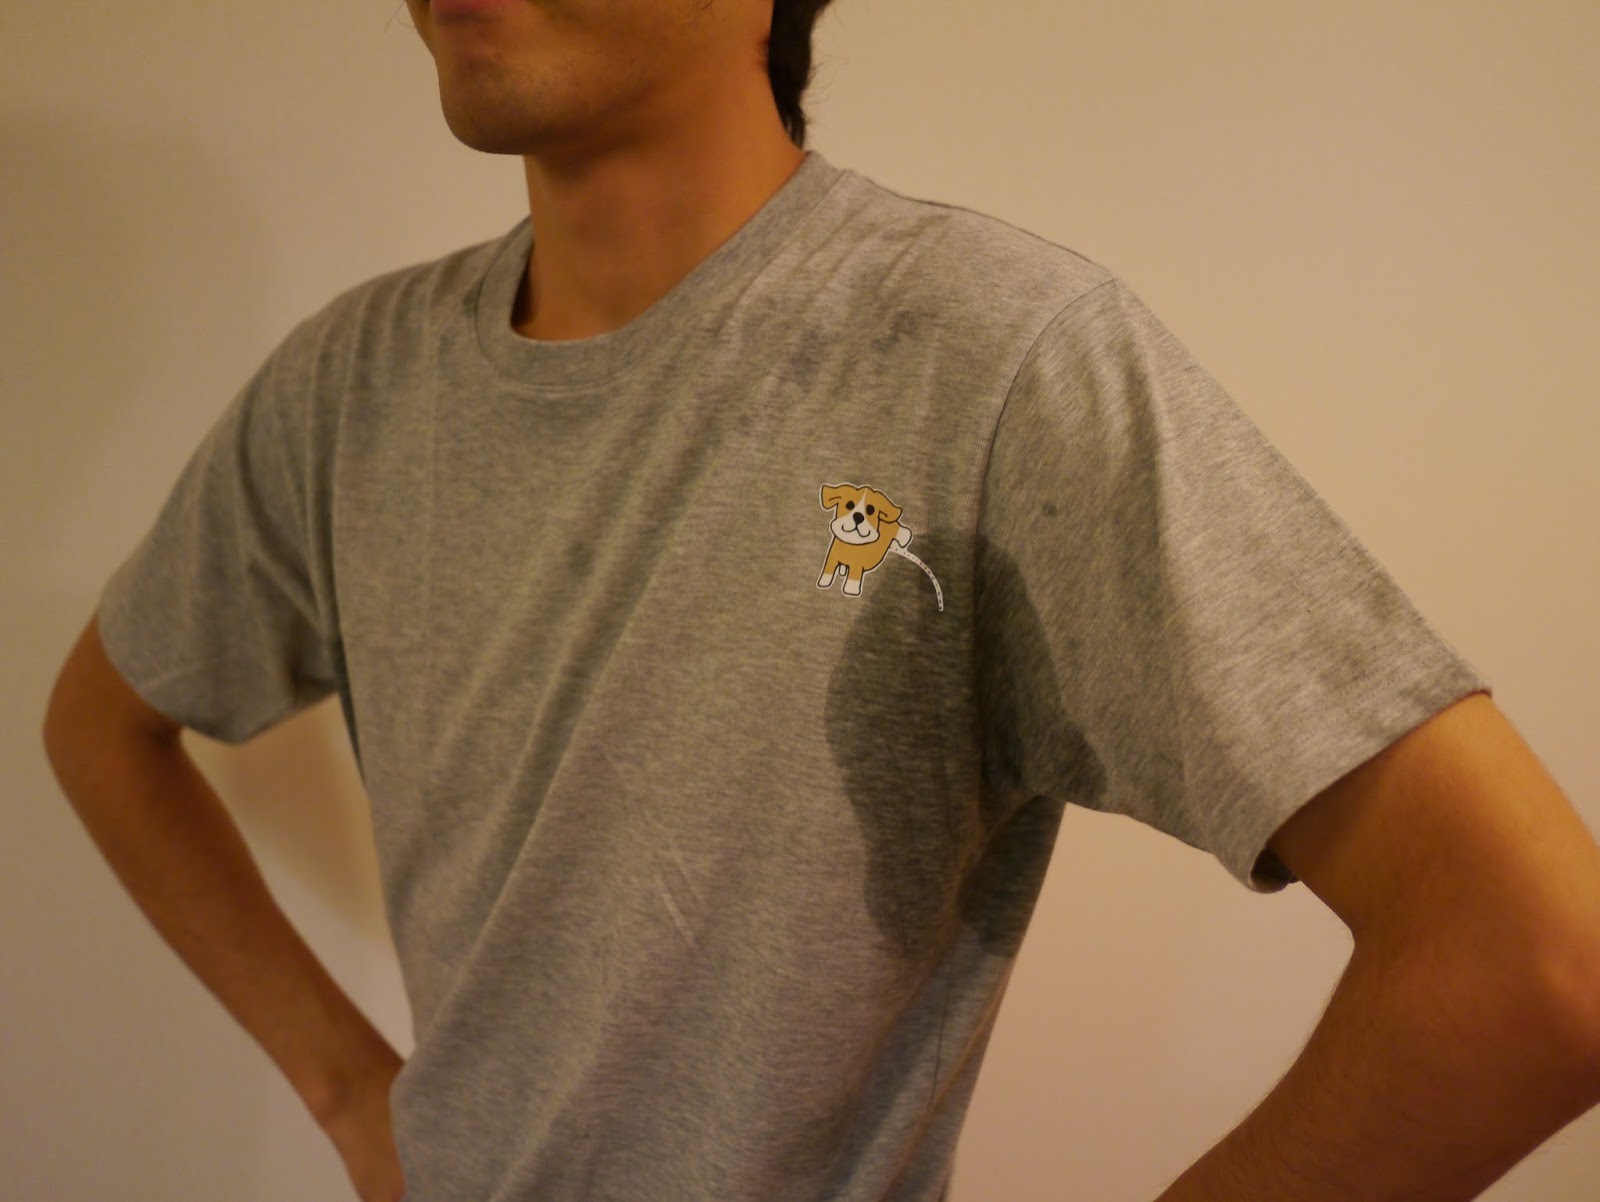
a T-shirt that tries to make sweat more loveable by incorporating it into the design.


The puppy gives your sweat a friendlier context, making it more loveable and socially acceptable.
Look at that. Totally loveable.


There's also a dude fishing from your sweat at the back.

If some things can't be stopped all together (like sweat), it may sometimes be worth thinking of a way to just love it.
Anyone who wants to purchase these, I'd love to hear from you.

脇汗をかいたほうが可愛くなるTシャツを作った

追記(15/06/13):好評につき販売開始しました。(送料無料)

脇汗の季節になりましたね。
脇汗というとネガティブなイメージしか浮かびませんが、せっかく人類が獲得した自衛反応、もっとポジティブに受け入れたいものです。
そこで「脇汗をかいたほうが可愛くなるTシャツ」というものを作ってみました。
こちらです。
既に可愛いですね。
なんでこれが脇汗かいたほうが可愛くなるんでしょうか?
実際に着て脇汗かいてみましょう。


こうなります。


こうです。

ワンコがいるおかげで脇汗が「あるべきところにある」ように見えます。

むしろ無いと物足りないぐらいですね。


ちなみに背中ではオッサンが脇汗で釣りしてます。

ネガティブな印象の強いものでも、うまくデザインの中に取り入れられればむしろポジティブなものになり得るんですね。

こちらで販売しているので、欲しい方は是非ポチってください。送料無料です。
これを着て撮影されてくれる変態も随時募集します。


作り方


せっかくなので、作り方も説明しときます。

(1) 絵を描く

うちの素敵な妻に描いてもらいました。
ちなみに1Click飲みのプロモーション動画の冒頭スケッチを描いてくれたのも妻です。素敵ですね。


(2) スキャンして彩色する

モニョモニョ塗ります。
インクジェットで印刷するので、色は自由に使えます。
大きさは、実際に何度か(普通の)紙に印刷して、自分に当てがってみて決めましょう。


(3) アイロンプリント用台紙を買ってくる

Tシャツに絵を貼り付けるための台紙なんてものが家電量販店とかに売ってます。
はがきサイズとかA4とか色々ありますが、今回の用途だとハガキサイズで十分です。
僕はビックカメラで¥600ぐらいでした。
Amazonでも売ってます:


(4) 印刷してアイロン付けする
あとは台紙の使い方を読みながら印刷+アイロン付けしましょう。
こんな乙女感たっぷりの作業場になります

注意点としては:

  • 台紙によっては反転させた絵が必要な場合もあるので気をつけましょう
  • 細い部分(釣り竿とか)は剥がれやすいので、念入りにアイロンがけして馴染ませましょう
  • 最適な貼り付け位置は、実際に自分で汗かいてみて汗の範囲に合わせるのがベストです。
最終的にこんな素敵なマイTシャツが出来上がります。洗濯も大丈夫らしいです。

深夜のノリで作った割には可愛い仕上がりになりました。
明日これを着て会社いってみようと思います。

ネガティブな物は「対処」するよりも「むしろ好き」にする方法を考えたほうがしっくりする場合もある、という何だか人生訓のような気づきがありました。
それではこの夏もポジティブに乗り切りましょう。